Step-by-Step Edge Lighting Setup Guide for South DFW Homes

Dark walkways and unlit garden borders are more than an eyesore — they’re a real hazard for families navigating their property after sunset. If you’ve ever fumbled for your front steps or watched a guest trip along your driveway, you already know the problem. Edge lighting solves it cleanly and affordably. The right setup defines your property’s lines, adds serious curb appeal, and makes your home more welcoming every night of the year. This guide walks you through exactly what edge lighting is, what you’ll need, how to install it step by step, and how to keep it running at its best in the South DFW climate.
Table of Contents
- What is edge lighting and why does it matter?
- Everything you need: Tools, materials, and prep
- Step-by-step edge lighting installation
- Troubleshooting, care, and getting the most from your edge lighting
- Results you can expect: Transformation and impact
- Our take: The underestimated value of edge lighting in DFW
- Ready for a pro-level edge lighting upgrade?
- Frequently asked questions
Key Takeaways
| Point | Details |
|---|---|
| Evening safety boost | Edge lighting dramatically improves nighttime safety on walkways and driveways. |
| Easy DIY options | Most edge lighting setups can be installed by homeowners with basic tools. |
| Long-term curb appeal | A well-designed edge lighting system adds lasting value and beauty to your property. |
| Pro installation available | Hiring an expert ensures durable, flawless lighting and zero headaches. |
What is edge lighting and why does it matter?
Edge lighting is one of the most practical upgrades you can make to a residential property. As a concept, low-voltage LED path lights or recessed fixtures placed along garden beds, driveways, walkways, and retaining walls define edges, enhance safety, and provide aesthetic illumination. The fixtures typically run on 12-volt low-voltage systems, which keeps energy costs low and makes DIY installation realistic for most homeowners.
The most common applications around a typical South DFW yard include:
- Driveways: Guiding vehicles and pedestrians along the approach to your home
- Walkways: Marking the safe path from your driveway or street to your front door
- Garden beds: Framing your landscaping with a smooth wash of light that highlights plantings
- Retaining walls: Accenting structural features and preventing trip hazards at grade changes
Why should you care? Beyond the obvious safety factor, well-placed edge lighting adds genuine value. Homes with thoughtful exterior lighting consistently attract stronger buyer interest, and the visual impact at night is immediate. You can also explore how edge lighting pairs with permanent patio lighting to create a fully finished outdoor look.
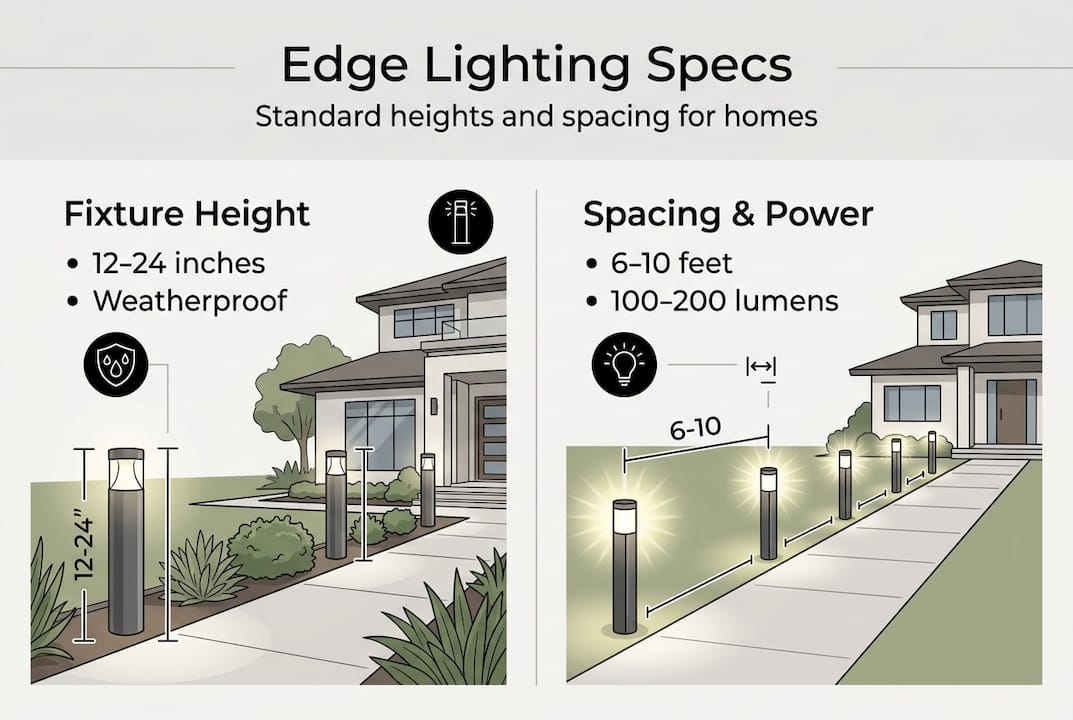
Standard specs to keep in mind: fixtures are typically 12 to 24 inches tall, spaced 6 to 10 feet apart, and rated at 100 to 200 lumens per light. Those numbers give you adequate coverage without washing out the yard or looking industrial.
| Feature | Edge lighting | Flood lighting | String lights |
|---|---|---|---|
| Primary use | Define borders, paths | Wide area illumination | Decorative/overhead |
| Typical voltage | 12V low-voltage | 120V or 12V | 120V or battery |
| Lumens per fixture | 100-200 | 700-2000 | 10-50 |
| Installation complexity | Low to medium | Medium | Low |
| Best for | Safety and accent | Security and sports areas | Ambiance |
For properties that also need accent and security lighting, edge lighting works in layers with those systems rather than replacing them. Follow garden edge lighting tips to see how professional landscapers integrate these layers for maximum effect.
Now that you understand why edge lighting can transform your property’s look and safety, let’s look at what it takes to get started.
Everything you need: Tools, materials, and prep
With your goal in mind, let’s make sure you have everything required for a smooth installation.
Gathering your materials before you dig a single inch will save you multiple trips to the hardware store. Here’s what a complete edge lighting setup typically requires:
| Item | Specification | Purpose |
|---|---|---|
| Low-voltage transformer | 100-300W, weatherproof | Powers the entire system |
| LED path light fixtures | 100-200 lumens, IP65+ rated | The visible lights |
| Low-voltage wire | 12 or 14 gauge, direct-burial | Connects fixtures to transformer |
| Wire connectors | Quick-connect or waterproof splice | Joins wire to fixture leads |
| Ground stakes | Match fixture base style | Secures lights in soil |
| Wire stripper | Standard | Preps wire ends |
| Flat-blade shovel or edger | Standard | Trenching for wire burial |
| Rubber mallet | Standard | Driving stakes into soil |
| GFCI outlet (if needed) | 120V outdoor-rated | Safe power source for transformer |
Choosing the right fixture type matters. Path lights work best for open walkways. Recessed in-ground fixtures suit driveways where foot traffic needs a flush surface. Wall-mounted bollard lights work well along retaining walls and raised beds.

Before you start placing anything, mark your utility lines. Call 811, the national dig-safe hotline, at least three business days before any digging. This is a non-negotiable step. Once utilities are marked, clear your installation area of mulch, rocks, and debris.
Learn more about how LED lighting works to better understand what your transformer and fixtures are doing before you wire them up.
Path lights spaced 6 to 10 feet apart with 100 to 200 lumens per fixture give you the most consistent illumination without hotspots or dark gaps.
Pro Tip: Before committing to a layout, use cheap solar stake lights or even glow sticks to mark your proposed fixture positions after dark. Walk the path and adjust spacing until you’re satisfied. This five-minute test can prevent a lot of re-digging.
Step-by-step edge lighting installation
Once you have your materials prepped and your plan in place, it’s time to install your edge lighting.
Low-voltage edge fixtures are weather-resistant and designed for continuous outdoor exposure, but installing them correctly still requires care and a logical sequence.
- Mark your layout. Use landscape paint or small flags to mark each fixture position along your path or border, maintaining your planned 6 to 10 foot spacing.
- Stake the path. Run a string line or garden hose along the edge you’re lighting to visualize the final result before you commit.
- Dig shallow trenches. Use a flat edger or spade to cut a 3 to 4 inch trench along the wire run. This keeps wiring below foot traffic and away from lawn equipment.
- Run your low-voltage wire. Lay the wire loosely in the trench, leaving a few extra inches at each fixture location for connection.
- Connect fixtures to the wire. Use your quick-connect fittings or waterproof splice connectors at each fixture point.
Always shut off power at the transformer before connecting wires. Never work on a live low-voltage system, even though the voltage is low. Wet soil and faulty connections can still cause shorts.
- Mount the transformer. Attach it to an exterior wall near your outdoor GFCI outlet, typically within six feet of the outlet.
- Connect the main wire run to the transformer. Follow the manufacturer’s instructions for terminal connections.
- Position and secure all fixtures. Drive stakes firmly into the soil, angling lights slightly toward the path for maximum coverage.
- Test the system. Power on the transformer and walk the full run, checking for unlit or dim fixtures.
- Bury and finish. Once everything works, cover the trench and tuck mulch or soil back around fixture bases.
Pro Tip: Quick-connect fittings snap onto wire without stripping or splicing, which speeds up installation and significantly reduces the chance of a wiring fault down the line.
If you’re weighing whether this level of setup is worth the time investment, the data is clear. Read whether permanent LED lights are worth it before you decide on a temporary or permanent approach.
Troubleshooting, care, and getting the most from your edge lighting
After your new edge lights brighten your walkways, keeping things working and looking good is all about maintenance and troubleshooting.
Edge lighting improves safety along borders and walkways, but only when the system is maintained properly. Here are the most common issues and how to address them:
- Flickering lights: Usually caused by a loose wire connection at the fixture or transformer terminal. Re-seat the connector and check that wire ends are making solid contact.
- One dark fixture in a working run: The most common cause is a failed bulb or a connector that wasn’t fully seated. Replace the LED module or re-connect.
- Entire run is dark: Check the transformer’s breaker or fuse first. Also confirm the timer or photocell is correctly set for your local sunset time.
- Moisture inside the fixture lens: Typically means the fixture seal has deteriorated. Replace the fixture or apply outdoor sealant around the lens ring.
- Uneven light distribution: Occurs when fixtures have shifted over time. Walk the run after heavy rain or lawn service and re-stake any lights that have tilted.
For routine maintenance, plan on a seasonal check: clean fixture lenses with a damp cloth, inspect wire runs for any surface exposure caused by erosion, and confirm all stakes are still firm in the ground. South DFW summers are tough on outdoor hardware, so checking in early spring and after summer storms is smart practice.
Browse permanent LED lighting tips for ongoing guidance on keeping all your exterior lighting systems in top shape. You’ll also find that a well-maintained system can increase your home’s value visibly over time.
Pro Tip: A programmable digital timer on your transformer, set to match local sunrise and sunset, cuts energy use significantly and removes the hassle of manual switching every night.
Results you can expect: Transformation and impact
Now that you have your system running smoothly, here’s what you can expect long term.
Edge lighting increases safety, curb appeal, and makes homes more welcoming while accentuating landscaping features. For Arlington and South DFW homeowners specifically, the nightly transformation is real and immediate.
| Before installation | After installation |
|---|---|
| Dark, undefined property edges | Clearly lit, safe pathways |
| No nighttime curb appeal | Polished, welcoming exterior |
| Guests unsure of walkway route | Obvious, well-marked path |
| Landscaping invisible after dusk | Garden features highlighted |
Tangible benefits you’ll notice quickly include extended time spent enjoying your outdoor spaces in the evening, reduced liability risk from trips and falls, and a noticeably sharper first impression for visitors and potential buyers. Explore value-adding lighting ideas to see how homeowners across the DFW metroplex are building on this foundation.
Our take: The underestimated value of edge lighting in DFW
Most homeowners we work with across Arlington, Mansfield, and the broader South DFW area start by asking about flood lighting or accent lighting for their rooflines. Edge lighting rarely comes up first. That’s a missed opportunity.
In our experience on local projects, edge lighting consistently delivers some of the highest satisfaction per dollar spent. It doesn’t compete visually with your home’s architecture. Instead, it frames everything else, making your whole property look more intentional and finished.
There’s also a durability argument specific to this region. South DFW summers push triple-digit heat, and winter storms like the 2021 freeze reminded everyone that outdoor hardware needs to hold up under real stress. Modern low-voltage LED systems, installed with proper waterproofing and quality connectors, handle that range without issue. Cutting corners on fixture quality to save a few dollars upfront typically results in a failing system within two seasons.
We’ve seen it consistently: homeowners who invest properly from the start, whether DIY or professionally installed, never regret it. The question of whether permanent LED lights are worth it almost always gets a definitive yes once the first night with edge lighting is experienced.
Ready for a pro-level edge lighting upgrade?
If you’d rather skip the hassle and enjoy professional results, here’s how you can make it happen.
DIY edge lighting is achievable for motivated homeowners, but professional installation guarantees proper fixture spacing, correct transformer sizing, and weatherproof connections built to last through South DFW’s demanding seasons. At DFW LED Pro, we handle everything from layout planning to final testing.

As the authorized JellyFish Lighting dealer for the Dallas-Fort Worth metroplex, we bring LED installation expertise to Arlington and 35 surrounding cities. Our JellyFish LED lighting services include permanent edge lighting that is custom-fitted to your property’s exact layout. Visit DFW LED Pro to request a free consultation and see what a finished installation looks like on homes just like yours.
Frequently asked questions
What is the ideal spacing for outdoor edge lighting along walkways?
Place LED path lights 6 to 10 feet apart along walkways for even, effective illumination without hotspots or dark gaps.
How bright should each edge light be for residential use?
Aim for 100 to 200 lumens per LED fixture, which adequately lights walkways and garden edges without creating a harsh, over-lit appearance.
Can I install edge lighting myself or should I hire a professional?
Many homeowners install low-voltage edge lighting successfully on their own, but a professional installation ensures correct sizing, safe wiring, and long-term reliability.
What areas benefit most from edge lighting in a typical yard?
Edge lighting works best along driveways, walkways, garden beds, and low retaining walls, where it defines transitions and improves nighttime navigation.
Recommended
- Permanent LED Lights in Dallas, TX | Professional Installation | DFW LED Pro
- Permanent LED Lights in North Richland Hills, TX | Professional Installation | DFW LED Pro
- About DFW LED Pro | Authorized JellyFish Lighting Dealer in Dallas-Fort Worth
- Permanent LED Lights in Fort Worth, TX | Professional Installation | DFW LED Pro
- Permanent Lights Edmonton | Soffit LED Lighting | Starise Lighting
- Permanent lighting installation workflow for Calgary homes